
Step‑by‑Step Guide to Installing Geo Sheets
Geo sheets, often referred to as geotextiles, are essential materials in civil engineering projects. They are widely used in road construction, drainage systems, and soil stabilization. By preventing erosion and strengthening soil, geo sheets extend the durability of infrastructure. Installing them correctly ensures maximum performance. This guide explains the process in simple steps.
🔧 Preparation Before Installation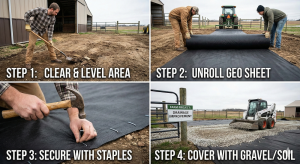
- Site survey: Evaluate soil type, drainage needs, and weak zones.
- Surface cleaning: Remove vegetation, stones, and debris that may damage the sheet.
- Material check: Inspect rolls for tears, punctures, or UV damage.
- Safe handling: Use proper equipment to move rolls without causing damage.
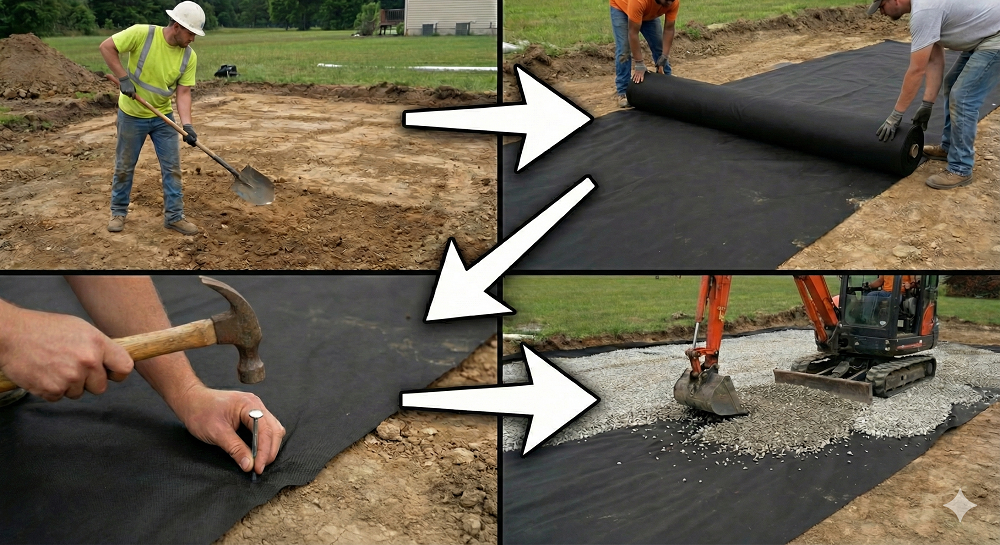
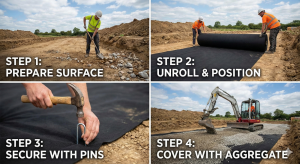
📐 Step‑by‑Step Installation Guide
- Step 1: Spread the sheet — Unroll the geo sheet evenly across the prepared surface.
- Step 2: Overlap edges — Maintain a 30–45 cm overlap to avoid gaps.
- Step 3: Fix in place — Anchor edges with pins, staples, or trenching.
- Step 4: Add cover material — Place soil, sand, or aggregates carefully without dragging machinery directly on the sheet.
- Step 5: Compact the surface — Compact the top layer to stabilize the sheet and ensure long‑term strength.
📊 Key Benefits of Proper Installation
| Advantage | Result |
|---|---|
| Soil stabilization | Improves load‑bearing capacity |
| Erosion prevention | Protects against water and wind damage |
| Better drainage | Allows water flow while retaining soil |
| Durability | Extends lifespan of roads and construction projects |
Step‑by‑Step Geo Sheet Success
Installing geo sheets is straightforward but requires careful preparation and precise execution. By following these steps, you can achieve stronger soil foundations, better drainage, and longer‑lasting infrastructure. Whether for roads, drainage systems, or landscaping, proper installation ensures efficiency and sustainability.